Grid banner · browser tool, no account
TikTok Banner Maker: One Photo into Three Posts
Begin with one photo
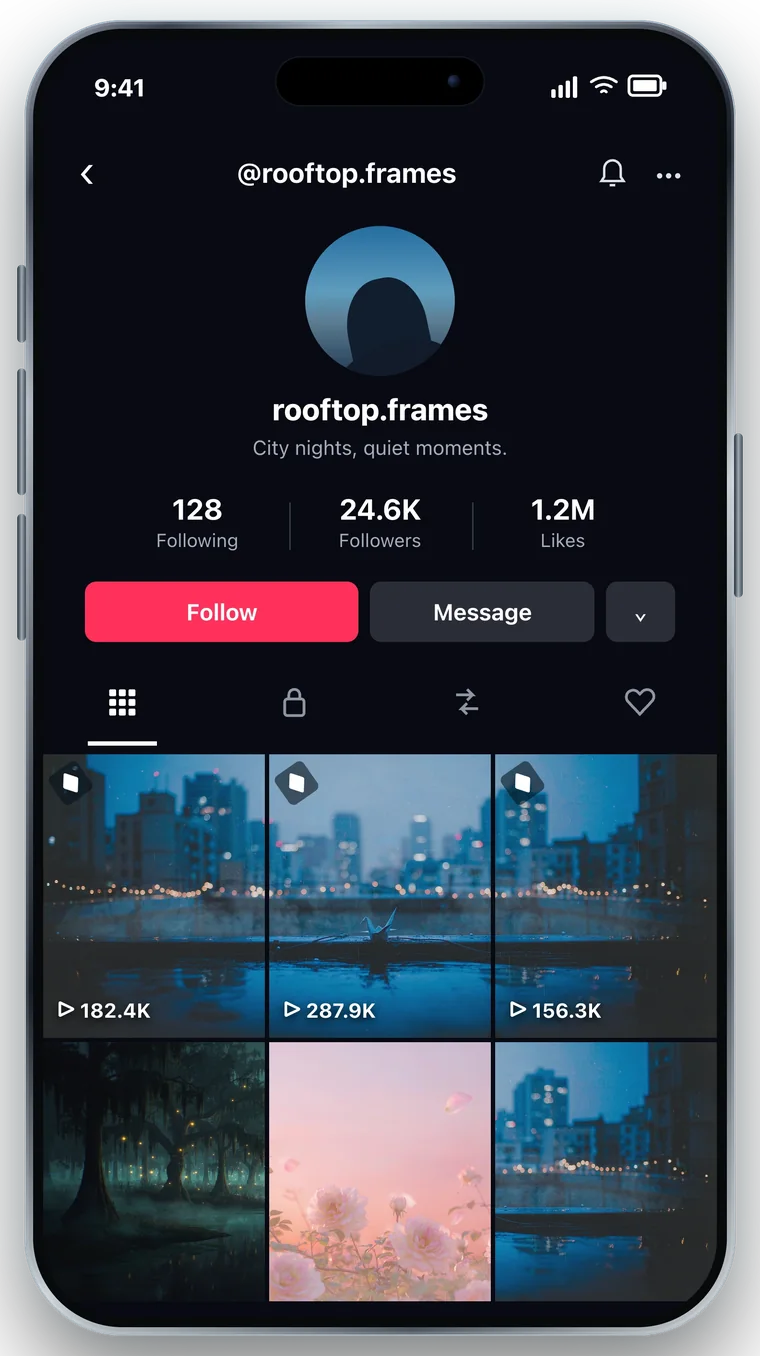
Pick an image and the splitter assembles the three posts.
Or drop an image here · JPG, PNG or WebP
Free · No account · Your image stays on your device
One photograph becomes three posts that line up. Watch the profile preview, then take the files in the order they need to be posted.
Nothing to hand? Start from one of the 21 free templates.
Make your banner free · in your browser
Frame it, check the preview, export
Drag and zoom until the crop works, look at the profile preview, then take the cells.
- 01 Add a photo
- 02 Adjust & preview
- 03 Download & post
The cutting needs JavaScript
This tool reads the image in the browser, so with scripting blocked there is nothing to show. The manual method still works everywhere: cut one 3240 × 1440 canvas into three 1080 × 1440 tiles in any image editor, then publish right → middle → left and pin all three. User report
Banner preview
Drag to move your photo. Use the controls below to adjust it.
TikTok profile preview
Abstract layout preview — not a screenshot of the app. A centered 3:4 crop is shown for 9:16 posts; TikTok layouts and crops may vary.
Photo
JPG, PNG or WebP. If HEIC does not open, convert it to JPEG or use a screenshot.
The sample is original artwork drawn in your browser.
Canvas and framing
100% is the size at which the photo already covers the canvas, so the frame is never half empty. Drag to move it; arrow keys nudge by 12 px, shift for 48 px; + and − zoom.
Export
Add a photo first — the buttons stay disabled while there is nothing to cut.
Ready. Nothing is uploaded: the photo is read in this tab and disappears when you close it.
The short answer
- No TikTok feature is required. Cut one wide photograph into three equal vertical cells, post them right → centre → left, then pin all three. The top row of your grid then reads as a single continuous picture.
- That arrangement is the three-post banner. It differs from the native profile background, which sits behind your avatar and hinges on an account option nobody can enable from their end — that route has its own guide.
- The figures are conventions, not specifications. 3240 × 1440, sliced into three 1080 × 1440 cells, is the community canvas. TikTok publishes no official dimension for either method, and this page will not invent one.
How do I make a TikTok banner with 3 posts?
The maker at the top of this page does exactly that in a single pass; with a photograph in hand it is the shorter road, and the figures are baked in. Prefer to cut by hand, or want to know why the cut lands where it does? What follows is the manual route, with the arithmetic and the failure modes attached.
Which of the two are you building?
One label covers two unrelated objects, and merging them is the most frequent mistake across the tutorials reviewed for this site. It explains why someone following a make-a-banner guide ends up hunting through their phone for a menu that was never there.
Native profile background
- What
- A single wide picture behind avatar, name and bio.
- Where
- The header strip above the grid.
- Feature?
- Yes: an account option, present or absent.
- DIY?
- The artwork only. Building cannot grant the option.
Three-post grid banner
- What
- One picture sawn into three vertical cells.
- Where
- Row one of the post grid.
- Feature?
- No: plain posts, pinned.
- DIY?
- Yes; the entire build is here.
This is the page you are on.
One sentence worth an hour of your time: when the editor offers no background control, three ordinary posts give you a grid banner without needing one. The converse holds as well — with the background option available, a header is a single upload and this page becomes optional.
One page, one method. The native background — where the control lives and what to do without it — belongs to how to get the banner and the not-showing guide. Neither is restated here.
Canvas and seams
Begin with a single wide photograph, never three separate files. A shared canvas is what keeps the cells aligned; crop each one independently and a pixel or two of drift makes the seams jog. Two shortcuts exist before you cut anything: the free tiktok banner templates are already laid out for this grid, and the tiktok banner size page lists every frame the canvas must satisfy.
-
Set the canvas User report
3240 × 1440 px covering three 1080 × 1440 cells: the convention shared by splitter tools and creator write-ups. It is not an official TikTok dimension, and no official figure exists for the native banner either. Read it as a working canvas.
-
Hold content away from the cell edges User report
Keep faces, type and marks off the two third-lines and clear of every cell boundary. Each cell in the grid is flanked by unrelated posts, and the gap swallows anything touching its edge.
-
No gutters, borders or shadows Official
Every seam in a finished banner is a gap the app supplies, not a line painted into the file. Bake in a border or a shadow and you get two seams where one belongs. The three-column layout is documented; the spacing comes with it.
-
With portrait sources, expect the middle band Unconfirmed
Per community figures, a 1080 × 1920 portrait shows roughly its central 1080 × 1440 band inside a cell. Nobody has measured this per device, so run the preview yourself before posting three times.
Happy to let something else do the arithmetic? The maker above cuts one photograph into three 1080 × 1440 cells, marks the seams and names the files in posting order. Decoding happens in the tab; nothing is uploaded. The manual route stays exactly as described — any editor with a fixed-size crop achieves the same result and leaves you the original.
What the maker does, and does not
Hand-cut splits fail in two predictable ways: thirds that miss by a few pixels, and a posting order that runs backwards. The tool addresses those two things and nothing more.
- Everything happens in the tab. Drag, zoom, rotate, download. The file is read locally, so there is no upload step to take on trust.
- The filenames encode the order. 01 is the right third, 02 the centre, 03 the left; the ZIP also carries post-order.txt repeating it in words.
- The preview is a drawing. The profile view is built from scratch here, so no part of it passes itself off as the app.
Back to the maker, or read on for the manual route, the figures and the reason the order runs backwards.
Publish, then pin
The order trips people up because it runs backwards: in most builds the cell you post first lands on the right. So post in reverse — right, centre, left — and the picture resolves correctly once the third one is live.
The sequence that works
Your image posting order
See your three posts
Publish each file on its own, beginning with 01. The preview follows your edits.
- Post the right cell first User report, then the centre, then the left. In most builds the newest post lands leftmost, hence the reversal.
- Visit your profile after every post. If the arrangement differs from the preview, work out how your app orders posts before continuing; re-pinning can help, though behaviour varies.
- Pin the three. Pinning keeps the row at the top once later posts arrive. Pinning itself is User report, not documentation, and whether a newer pin can push one out of the row is Unconfirmed.
- Reload and read the row. Should the picture run backwards, re-pin in the sequence you want and inspect the result; pin behaviour varies by build.
Why not a single post? The grid banner is three posts by construction; the seams are the app's column gaps. One wide upload renders as a lone portrait cell, never a strip. No one-post variant of this method exists.
Four ways it breaks
Almost every broken grid banner in the material we reviewed failed in one of four ways. Each is visible in your own preview before a single stranger sees it:
The seams jog
Cause: one cell a pixel out, or three files cropped apart.
Fix: re-cut from the one 3240 × 1440 canvas; never crop cells by hand.
Lettering gets clipped
Cause: type or a face touching the boundary, swallowed by the gap.
Fix: hold content a margin back from the third-lines, then re-cut and repost.
The row runs backwards
Cause: the grid runs opposite to your assumption and the pins follow that assumption — the errors compound.
Fix: re-pin and inspect the row; behaviour varies by build.
The artwork belongs to someone else
Cause: a screenshot of a different profile used as source, its interface cropped into a strip.
Fix: use art you own. Another person's profile is both a rights problem and a cropping one.
One check catches all four: open your profile after the third post and before pinning. Every failure costs less to find there than in a stranger's comment.
Sizes, pinning, and that feature
Is a three-post banner the same as a profile background?
No. The background is a header picture behind your avatar and depends on an account option; the three-post banner is three plain posts occupying row one of your grid. Different position, different machinery — the get guide handles the first, this page the second.
What size should the image be?
3240 × 1440 px across three 1080 × 1440 cells, by community convention. TikTok publishes no official grid-banner dimension, and none for the native background either. The size page lists each figure with its evidence grade, including what the grid cuts from every cell.
Do I have to pin the posts?
Users report it as the way the row keeps its place once newer posts arrive; it is not documented. Check on your own profile, and re-pin if the row drifts.
Can I do this without the banner feature?
Yes, and that is the entire point: the method relies on ordinary posts and pinning instead of the native control. Availability of posting and pinning can still vary.
Will it work if my grid is a different shape?
Untested across layouts. Three columns is the documented default, yet the visible band in each cell can differ by device — run the preview before committing three posts.
Can a tool do the splitting for me?
Yes. The maker above cuts the photograph inside your browser and returns three files in posting order, uploading nothing. Outside splitters perform the same cut with the usual upload-box trade-off: you cannot see where the file travels. A desktop editor with a fixed-size crop is the third option, and the source never leaves your machine.